Content from Why Version Control?
Last updated on 2025-11-11 | Edit this page
Estimated time: 18 minutes
Overview
Questions
- What problem does version control solve?
- When should I use Git?
Objectives
- Describe what a version control system (VCS) does.
- List at least three reasons why using Git can improve your workflow.
- Outline the key components of a Git repository (working directory, staging area, commit history).
Have you ever found yourself with a folder full of files like this?
report.docxreport_final.docxreport_final_v2.docxreport_final_for_real_this_time.docxreport_final_sent_to_boss.docx
Or maybe you’ve been working on a file and thought, “I wish I could go back to the version I had yesterday before I deleted that paragraph.”
This is the kind of problem that version control is designed to solve.
Introduction
Version control is like a digital lab notebook: it keeps a dated, permanent record of every meaningful change you make to your project files. In this episode we introduce Git, the distributed version control system we will use throughout the lesson.
A VCS helps you:
- keep files synchronised across multiple machines,
- recover previous states of your project (including deleted files!),
- discover who changed what, when, and why,
- collaborate safely with colleagues, and
- showcase the evolution of your work.
In this workshop we will explore:
- tracking changes locally,
- sharing work using GitLab, a web-based platform for hosting your Git repositories and collaborating with others,
- collaborating via pushes, pulls, and merge requests, and
- branching to develop new ideas without breaking the main line of development.
Learners often try to remember all Git commands at
once. Reassure them that they only need a handful today:
git config, git init, git status,
git add, and git commit. Emphasise the
conceptual model (working directory → staging area → repository) before
the syntax.
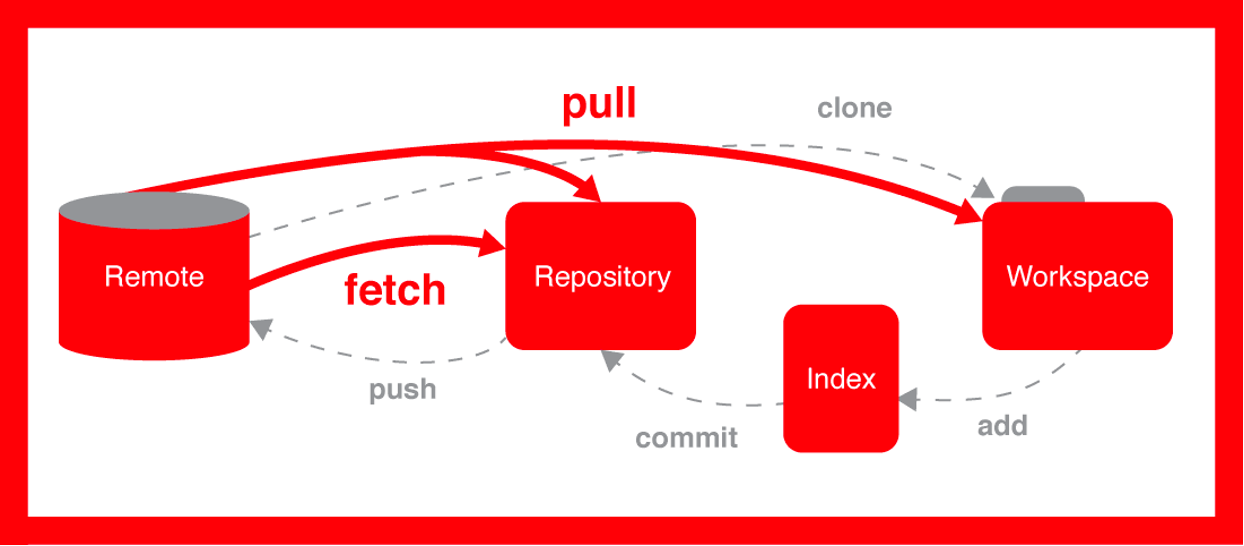
The Git Workflow

The diagram above summarises the flow of information in a Git repository.
Here is what these terms mean:
- Working Directory: The folder on your computer where your project files live. This is where you do all your work: creating, editing, and deleting files.
- Staging Area (or Index): A “waiting room” for your changes. You select which changes from your working directory you want to save, and you add them to the staging area. This allows you to group related changes into a single, meaningful snapshot.
- Repository (or Commit History): The permanent, dated record of all the snapshots you have saved. Once a change is committed from the staging area to the repository, it’s saved in your project’s history.
Challenge
1: Why bother?
Which of the following is not a typical reason to use a version control system?
A. Keeping files synchronised between two laptops
B. Tracking the history of code changes
C. Encrypting files to keep them secret
D. Collaborating with colleagues on a shared project
C. Encrypting files. While encryption is possible, it is not the primary purpose of a version control system.
- Version control records every meaningful change to your project.
- Git’s three-step workflow is: edit → stage → commit.
- Version control facilitates collaboration, provenance, and backup.
Content from Configuring Git
Last updated on 2025-11-11 | Edit this page
Estimated time: 13 minutes
Overview
Questions
- How does Git know who I am?
- What is the difference between local, global, and system configuration?
- Which Git settings are helpful to change right away?
Objectives
- Explain the purpose of the
git configcommand. - Distinguish the three configuration levels used by Git
(
--system,--global,--local). - Set a username, email address, colour output, default editor, and pull behaviour.
- View and edit the
~/.gitconfigfile safely.
Introduction
Before we can record changes, Git needs to know who
is making them. It also allows you to tailor its behaviour. All of this
is handled by the git config command, which writes
preferences to one of three configuration files (listed from lowest to
highest priority):
| Level | File | Scope |
|---|---|---|
| System | /etc/gitconfig |
Every user on the machine |
| Global | ~/.gitconfig |
All repositories for you |
| Local | .git/config |
Single repository only |
When Git looks up a setting it starts locally and works upward, so local settings override global, which override system.
Learners may have already used Git on their computers. Ask them to
run git config --list --show-origin to display where each
value is coming from. This often reveals surprises (e.g. an IDE has
silently set the editor to vim).
1. Identify yourself
The first thing you should do is configure Git so that it understands
who you are. The git config command allows you to set Git
configuration values that can help you create a customized Git
workflow.
To set your email and username, type
Replace “Your Name” with your actual name and “you@example.com” with
your email address. Using the --global flag ensures these
settings apply to every Git repository on your computer, so you won’t
have to set them up for each new project.
Think Before You Share: Email Addresses in Git While Git requires an email address for your commits, be mindful about the address you use. Your commit email address becomes part of the public history of any repository you push to a public platform (like GitHub or GitLab).
Here’s why this matters and what you can do:
Privacy Concerns: A public email address can be scraped by bots, leading to more spam or unwanted solicitations. Security Risks: In some rare cases, a public email could potentially be used for targeted attacks if combined with other publicly available information. What are your options?
Use a dedicated “no-reply” email provided by your Git hosting service: GitHub, for example, offers a “noreply” email address you can use. This keeps your personal email private while still uniquely identifying your commits. Check your account settings on platforms like GitHub or GitLab for this option. Use a separate email address: You could use an email address specifically for Git commits that you don’t use for other personal or critical communications. Keep private repositories private: If you’re working on a private project, your email address is only visible to those with access to the repository. Always consider the visibility of your repository and choose an email strategy that aligns with your privacy preferences.
Challenge 1: Check your work
- Run
git config --global --listto confirm that your name and email were saved. - Where would the same information be stored if you had used
--localinstead?
-
Your terminal should show lines similar to
user.name=Your Name
user.email=you@example.com
With the
--localflag the values are written to.git/configinside the current repository, leaving other projects unaffected.
2. Make output readable
With colour enabled, Git highlights additions (green), deletions (red), and branch names, making the status information easier to parse.
Example Configuration for Red-Green Colorblindness (Deuteranopia/Protanopia)
For someone with red-green colorblindness, avoiding pure red and green for critical distinctions is key. Here’s an example configuration that uses blues, purples, and yellows instead:
BASH
# General UI color (already set to auto)
git config --global color.ui auto

# Diff colors
git config --global color.diff.old "magenta bold"  # Changed from red
git config --global color.diff.new "cyan bold"    # Changed from green
git config --global color.diff.meta "blue"
git config --global color.diff.frag "yellow"

# Status colors
git config --global color.status.added "cyan bold"      # Changed from green
git config --global color.status.changed "yellow bold"  # Often orange/yellow by default, keep it distinct
git config --global color.status.untracked "magenta"    # Changed from red

# Branch colors
git config --global color.branch.current "yellow bold"
git config --global color.branch.local "cyan"
git config --global color.branch.remote "magenta"
3. Choose your editor
Git drops you into an editor for multi‑line commit messages, merge conflict resolutions, and interactive rebases. Pick an editor you are comfortable with (common choices are nano, code –wait, or notepad.exe on Windows).
4. Tame autocorrect and pulls
BASH
$ git config --global help.autocorrect 1   # Suggest closest command after 1/10 second
$ git config --global pull.rebase false    # Default to merge when running `git pull`
Autocorrect spares you from typos, while the pull setting aligns behaviour with the rest of this workshop (merging instead of rebasing).
Challenge 2: Inspect your
.gitconfig
Use cat ~/.gitconfig (or open the file in your editor)
and locate the lines you just added. Which section header
([user], [core], etc.) does each belong
to?
-
[user]containsnameandemail. -
[core]containseditorand options such asautocorrect. -
[color]storesui = auto.
5. Override settings per‑project
Occasionally a project needs a different identity (e.g. when contributing to an open‑source repository on behalf of a separate organisation). Add local overrides inside the project directory:
BASH
$ git config --local user.name "Open Source Bot"
$ git config --local user.email "bot@example.org"
These values live in .git/config and apply only to that
repository.
Challenge 3: Predict the result
You have the following configuration hierarchy:
- System:
user.email = root@machine - Global: none set
- Local:
user.email = user@project
What email address will Git record when you commit inside the project directory? What happens if you commit in a different repository?
- Inside the project directory Git will record user@project because local overrides everything else.
- In any other repository Git falls back to the system‑wide value root@machine.
Key commands reference
BASH
# View all settings (with their files)
$ git config --list --show-origin

# Set values
$ git config --global user.name "Your Name"
$ git config --local  color.ui auto

# Edit configuration interactively (opens editor)
$ git config --global --edit-
git configwrites and reads Git’s preference files. - Three levels exist: system, global, local; the closest level wins.
- Setting your name and email globally ensures commits are attributed correctly.
- Colour, editor, and autocorrect options improve usability.
Content from Recording Changes Locally
Last updated on 2025-11-11 | Edit this page
Estimated time: 25 minutes
Overview
Questions
- How do I create a new Git repository for my project?
- How do I check which files have been modified?
- How do I record a snapshot of my work?
- How can I review what has changed between versions?
Objectives
- Initialise a repository with
git init. - Explain the roles of the working directory, staging area, and repository.
- Track new or modified files with
git addand record them withgit commit. - Use
git statusto see the state of the working directory and staging area. - Compare changes with
git diffand inspect history withgit log. - Restore a file to an earlier state with
git restore(orgit checkout --for older Git versions).
Introduction
With Git configured, we can start tracking changes.
Think of Git as a camera: every time you take a commit you
capture a snapshot of the files that are staged. Much like
arranging subjects before pressing the shutter, you choose what
to record with git add.
Three locations matter (see diagram below):
- Working directory – files you edit in your editor/IDE.
- Staging area – a holding zone for the next snapshot.
- Repository – the permanent, time‑stamped history.
Some learners struggle with the staging area at first. Compare it to
packing items into a box (staging) before placing the box in long‑term
storage (repository). Running git status after every major
step reinforces the mental model.
1. Create a repository
A repository, or repo, is a fundamental element of Git. It’s a space where project files live, allowing for version control and collaboration.
You can think of a repository as a project folder that tracks changes, stores history, and lets multiple people work together seamlessly.
We are going to create a folder for our project
MyProject which will turn into a git repository.
You can go into MyProject by running
In its current state the directory, MyProject is not a
Git repository.
If you want this folder to be a Git repository so that you can track
all changes you make, type git init command.
When you run the git init command in an ordinary folder,
it allows you to transform that folder into a trackable git repository
where you can use Git commands.
git init creates a hidden .git folder that
stores all future history.
Challenge 1: First contact
Run git status immediately after git init.
What output do you see and why?
Git reports
On branch main (or master)

No commits yet
nothing to commit (create/copy files and use "git add" to track)
because we have not created any files or commits; the repository is empty.
2. Add a README file
A README file in a Git repository provides essential information about the project, including its purpose, usage instructions, how to get started, where to find help, and details on contributors. It serves as an introductory guide for visitors, helping them understand and utilize the project effectively
Markdown Files
README files are typically named README.md. The .md extension indicates that the file is written in Markdown, a lightweight markup language that allows you to add formatting (like headings, bold text, lists, and code blocks) using plain text.
When you view a repository on platforms like GitHub, GitLab, or Bitbucket, they automatically detect README.md (or similar filenames like README.txt, README) in the root directory. These platforms then render the Markdown content into beautifully formatted HTML, making the project’s introduction easily readable directly in your web browser without needing to open the file in a text editor. This automatic rendering is a key reason Markdown is so popular for repository documentation.
Let’s create a new file by running touch README.md then run git
status again. Now you should see that you have an untracked file
README.md.
OUTPUT
On branch main

No commits yet

Untracked files:
  (use "git add <file>..." to include in what will be committed)
    README.md

nothing added to commit but untracked files present (use "git add" to track)
An untracked file is one that has not been added to the staging area.
To add files to the staging area, you can use the git add
command.
Git add
There are quite a few ways to use this command. For example, you can
use git add . to add all files to the staging area from the
working directory or use git add filename to add a specific
file to the staging area.
If you run git status again, this will show you that
README.md is in the staging area
OUTPUT
On branch main

No commits yet

Changes to be committed:
  (use "git rm --cached <file>..." to unstage)
    new file:   README.md
When files are added to the staging area, that means they are in safe keeping before you commit them. Think of using the Git add command as telling Git, “Please keep track of this file in its current state.”
Staging tells Git which changes, Changes to be committed, belong to the next snapshot.
If you make additional changes to the tracked files, you’ll need to
use the git add command again for Git to keep track of
them.
3. Commit the snapshot
To add snapshot to repository use the git commit
command. For each commit you will need to add a message using the
-m option.
Git messages
- Limit the Subject Line: Keep the subject or summary line to 50 characters or fewer. This ensures it’s easily readable in various Git tools.
- Use the Imperative Mood: Frame your commit message as a command or action, e.g., “Fix” rather than “Fixed” or “Fixes.”
- Avoid Vague Messages: Instead of writing “Update code” or “Fix bug”, specify what you did, such as “Add error handling for login process.”
Let’s run git commit -m “initial commit” to see what happens.
OUTPUT
[main (root-commit) 72041c0] Add README with project title
 1 file changed, 1 insertion(+)
 create mode 100644 README.md
Every commit receives a unique 40‑character hash (displayed here as 72041c0 for brevity).
You’ll see that you have “1 file changed, 1 insertion(+)” because you just added one new files, and the files has one line of code.
Now that your changes are committed, your working directory should be clean. You can verify this by running git status again:
This output means there are no new changes to track or commit since your last snapshot. Your project’s state is now safely recorded in your Git history!
OUTPUT
On branch main
nothing to commit, working tree clean
That’s how you use the git add and git commit commands together! Well done tracking changes and storing your new work.
Git Log: Tracing Your Project’s History
The git log command is your window into the history of
your Git repository. After you’ve made and committed changes (like we
did with the README.md file), your git status shows a clean
working tree because those changes are now safely recorded.
git log then lets you see a chronological list of all those
recorded commits, starting from the most recent one and working
backward. Each commit represents a snapshot of your project at a
specific point in time, along with who made the change and why.
OUTPUT
commit f00b5b49b39884a9bf978bc272c82d862976abcb (HEAD -> main)
Author: firstname surname <emailaddress@ed.ac.uk>
Date: Tue Sep 24 10:06:58 2024 +0100
initial commitChallenge 2: Where is my commit?
Use git log --oneline to view the history. How many
commits appear and what information is shown?
One commit appears:
72041c0 (HEAD -> main) initial commitWe see the abbreviated hash, the branch name, and the commit message.
4. Modifying a file
Edit README.md
add a Run Script section
# My eddie Python project
To run Python on eddie need to run:
module load igmm/apps/python/3.12.3git status
OUTPUT
On branch main
Changes not staged for commit:
  (use "git add <file>..." to update what will be committed)
  (use "git restore <file>..." to discard changes in working directory)
    modified:   README.md
Viewing changes
We can use the command git diff to view our change.
OUTPUT
diff --git a/README.md b/README.md
index a4c6c69..603f621 100644
--- a/README.md
+++ b/README.md
@@ -1 +1,4 @@
 # My eddie Python project
+
+To run Python on eddie need to run:
+module load igmm/apps/python/3.12.3
What Each Part Means
diff --git a/README.md b/README.md
-
This is the file being changed:
README.md -
a/README.md= the old version -
b/README.md= the new version - This line starts the diff block for that file.
index a4c6c69..603f621 100644
-
a4c6c69= commit hash of the file before the change -
603f621= commit hash of the file after the change -
100644= file mode (normal non-executable file)
Stage and commit the update:
Once we are happy with the changes we can stage the changes and then commit into the git repository.
OUTPUT
[main 370eb9d] Describe how to run analysis script
  1 file changed, 3 insertions(+)
5. Inspecting differences between commits
HEAD is a symbolic name for the current commit;
HEAD~1 means one commit ago.
OUTPUT
diff --git a/README.md b/README.md
index a4c6c69..603f621 100644
--- a/README.md
+++ b/README.md
@@ -1 +1,4 @@
 # My eddie Python project
+
+To run Python on eddie need to run:
+module load igmm/apps/python/3.12.3
Challenge 3: Predict the diff
Suppose the original README contained only a title. After adding a section called Data, what colour will the new lines appear in the diff output and why?
They will be green with a + prefix because new lines are additions relative to the previous snapshot.
6. Undoing a change in the working directory
If you accidently stage a file you can discard
unstaged edits using git restore:
BASH
$ git restore README.md   # newer Git (>=2.23)
# or
$ git checkout -- README.md  # older Git versions
Be cautious: this removes changes permanently unless they were staged or committed.
7. Adding directories and data
Git tracks files, not empty directories. To include
a folder you must add at least one file inside it (often an empty
.gitkeep):
Copy a file into a Data directory
BASH
$ mkdir Data
$ cp /exports/igmm/software-rl9/bac/dataWranglingGenomics/20230529/workshop_data/combined_tidy_vcf.csv Data/data.csv
We can now add it to staging area and commit to repository.
BASH
$ git add Data/data.csv # Comment on when to commit data
$ git commit -m "Add example dataset"Challenge 4: Multiple file workflow
- Create a simple Python script Src/hello.py.
- Add and commit it.
git add&git commit - Then modify the script to read the CSV file added above and print the number of rows.
PYTHON
#!/usr/bin/env python

# load pandas library
import pandas as pd

# Read the data
variants =  pd.read_csv("Data/data.csv")

# Check we have the data
print(variants)- Use
git diffbefore committing to verify the change.
8. Viewing the complete history
-
git initturns a directory into a repository by creating.git. -
git statusgives you a report on your git repository. - Stage files with
git add; record them permanently withgit commit -m. - Use
git diffto inspect unstaged or staged changes. -
git logreveals the history; hashes uniquely identify commits. - Empty directories are not tracked—add a file such
as
.gitkeep. -
git restorereturns a file to a known state.
Content from Working with Remote Repositories
Last updated on 2025-11-11 | Edit this page
Estimated time: 19 minutes
Overview
Questions
- What is a remote in Git?
- How do I connect my local repository to one hosted on GitLab?
- How do I share my work (push) and incorporate others’ work (pull)?
- What should I do if a push is rejected because my branch is behind?
Objectives
- Define the term remote and list at least two common hosting services.
- Create a new remote connection with
git remote addand publish code withgit push -u origin main. - Retrieve updates with
git pulland explain the difference betweengit pullandgit fetch. - Resolve a simple non‑fast‑forward push rejection by pulling before pushing.
Introduction
A Git remote is a shorthand name for a version of your project hosted elsewhere, typically on a server like GitLab or GitHub. Remotes allow you to share your history and collaborate with others.
University of Edinburgh GitLab Repository
The University of Edinburgh provides a Git Repository hosting service using GitLab more information here
Log into GitLab, https://git.ecdf.ed.ac.uk, using your University of Edinburgh credentials.
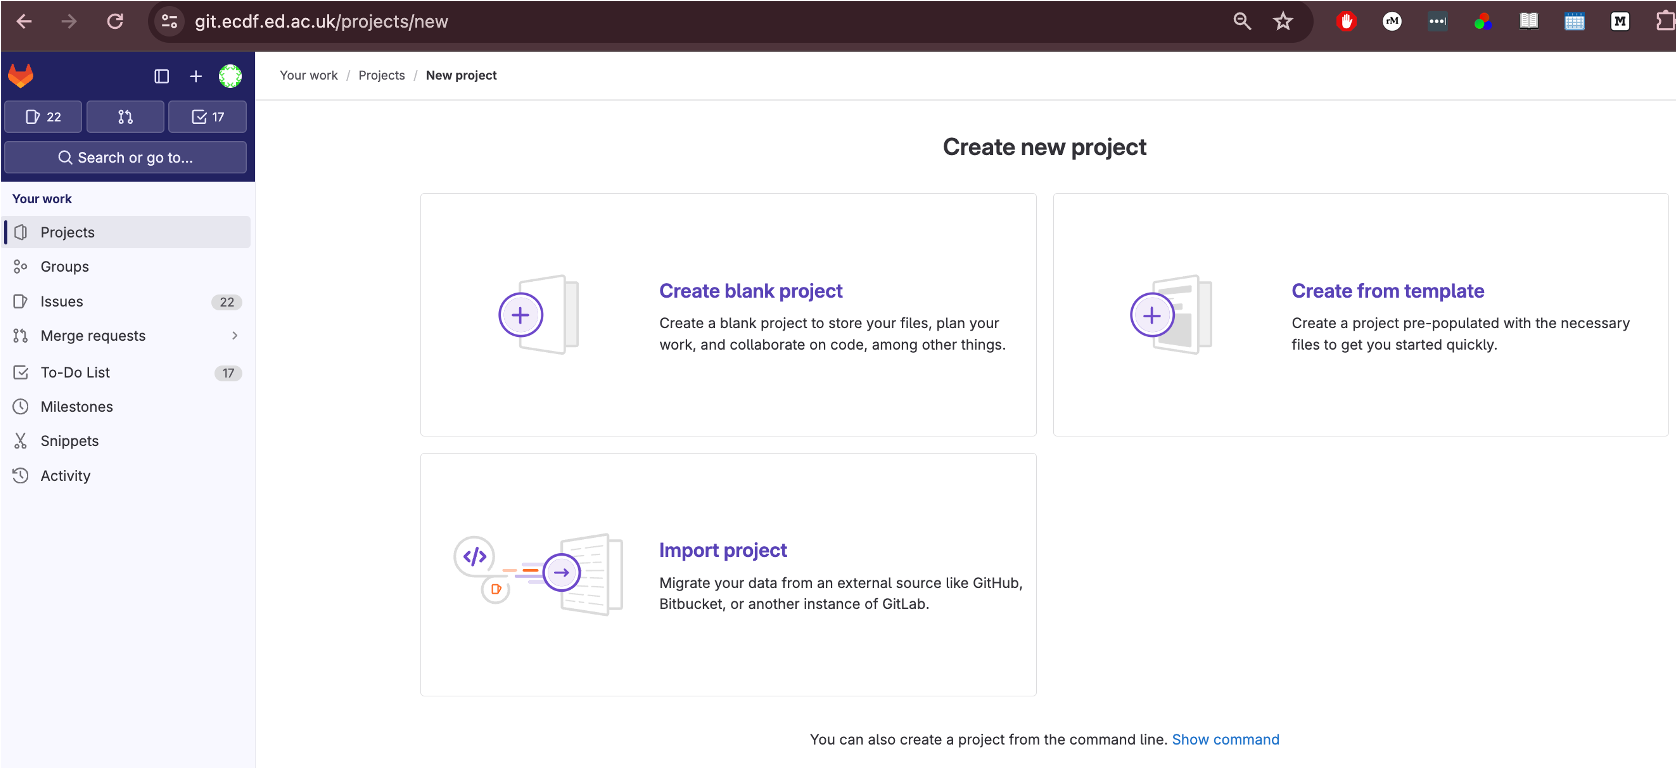
Create New Project
-
Select New project
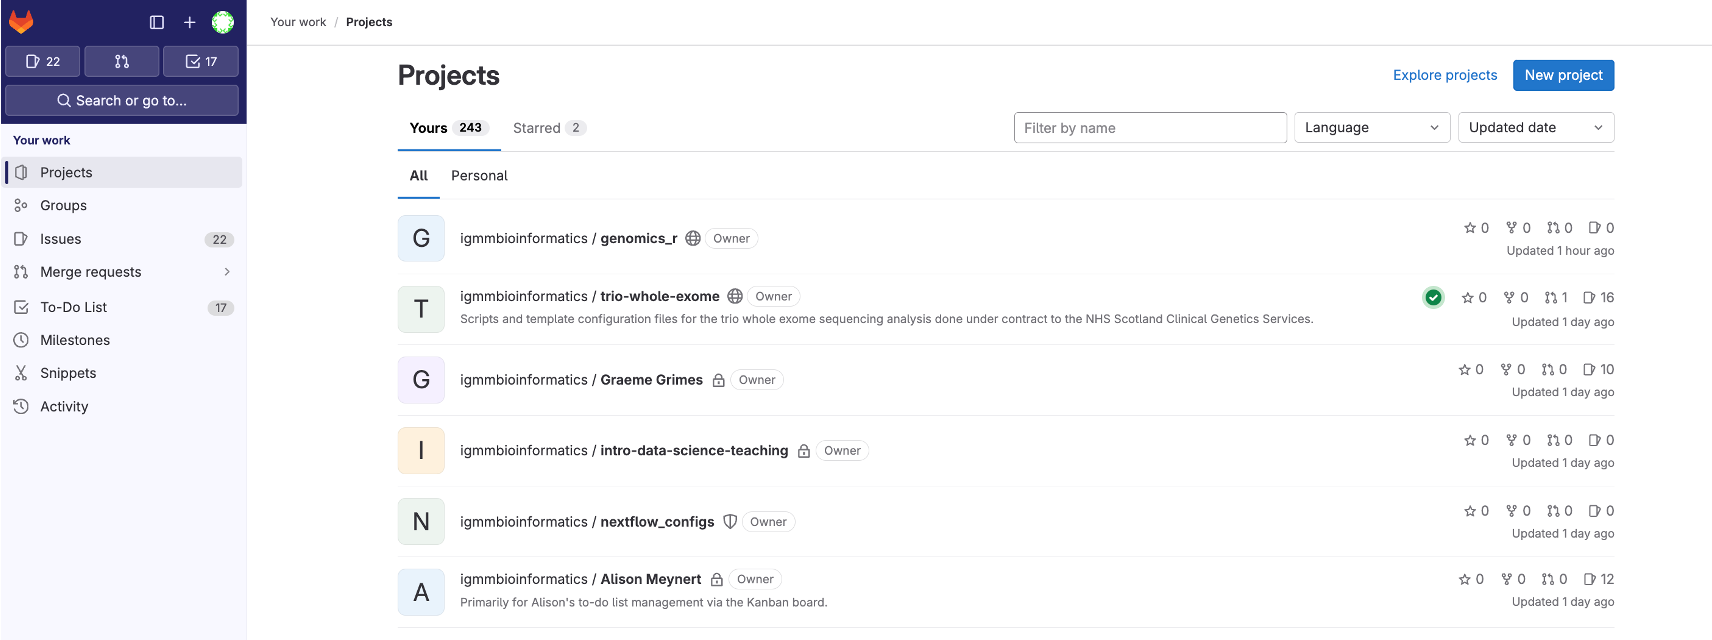
-
Select Create blank project
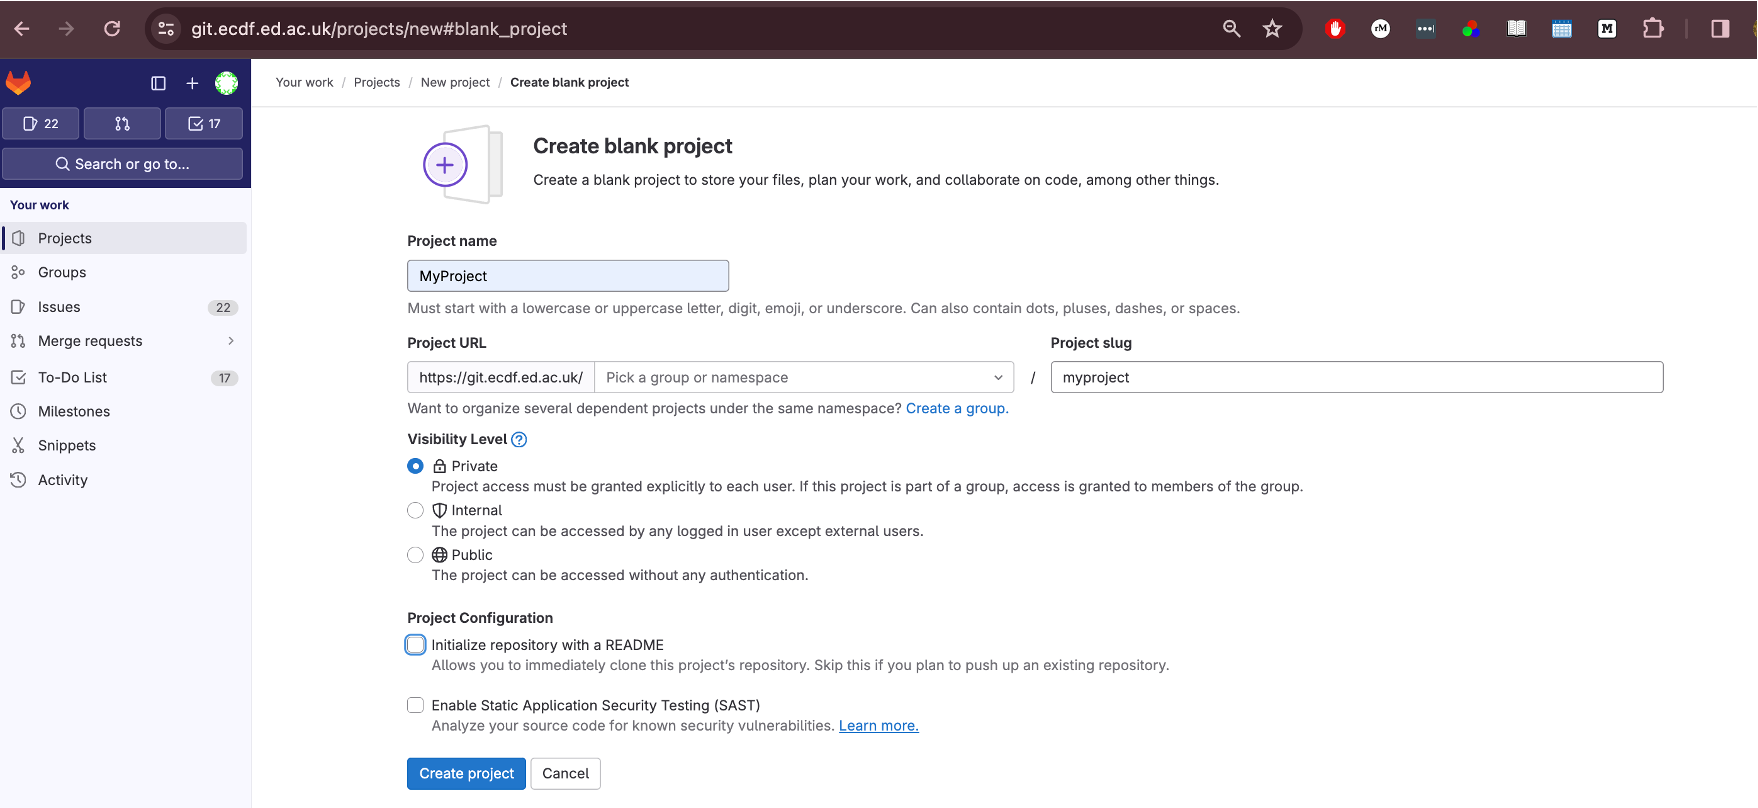
Add a Project Name MyProject
Un-tick Project Configuration->Initialize with A README
-
Click Create Project
6.This will create an Empty Repository, with details on how to link your existing git repository.
GitLab security
To enable password less access to your remote, you can add your public SSH Key from Eddie to the remote repository.
Generating a new SSH key
You can generate a new SSH key on your local machine. After you generate the key, you can add the public key to your account on GitLab to enable authentication for Git operations over SSH.
The University guide can be found here
Example below
BASH
[username@login02(eddie) ~]$ ssh-keygen -o -t ed25519
Generating public/private ed25519 key pair.
Enter file in which to save the key (/home/username/.ssh/id_ed25519):
Enter passphrase (empty for no passphrase):
Enter same passphrase again:
Your identification has been saved in /home/username/.ssh/id_ed25519.
Your public key has been saved in /home/username/.ssh/id_ed25519.pub.
The key fingerprint is:
SHA256:3t/tZzvbviR5Xs1YYYQeaGtI2n02W(and some more characters)hxxt (email address of the user)
The key's randomart image is:
+--[ED25519 256]--+
|  oo..   .  o... |
| o. o o ...o.+.  |
|  .+ + o+ +o+ .o |
| E  o o. o +.B. .|
|        S . = o .|
|       . . .  .+.|
|        . .  o.o+|
|           . .=o=|
|            . .O@|
+----[SHA256]-----+
This will generate two files: the private key file (in this example
/home/username/.ssh/id_ed25519) and the public key file
(/home/username/.ssh/id_ed25519.pub) - it is vitally
important that you never share your private key
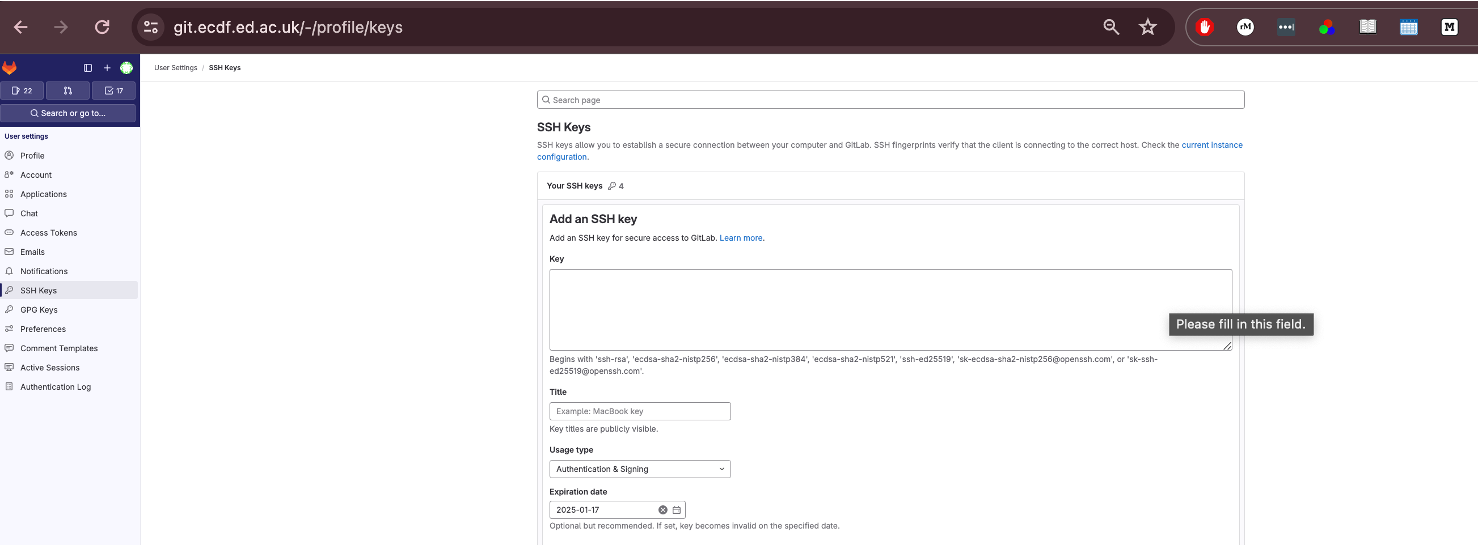
You can now add the contents of the public key file
id_ed25519.pub to the GitLab.
Go to https://git.ecdf.ed.ac.uk/-/user_settings/ssh_keys then click add new key
Git Remote on Eddie
Here we will link our existing repository on Eddie with the remote on
GitLab, using the git remote command.
To add out remote we use git remote add using the
information on the blank GitLab Repository page.
We can now use the git remote -v command to see it has
been linked.
Origin
The name “origin” for a git remote is not inherently special to Git’s internal mechanics, but it is a widely accepted convention and has a few notable points:
Default Name: When you clone a repository from a remote source using
git clone
Widely Recognized: Because of this default behavior, many developers expect “origin” to refer to the primary or original repository from which the project was cloned. This shared understanding can help with clarity when collaborating.
Can be Renamed or Removed: There’s nothing binding about the name “origin.” You can rename it or even have multiple remotes with different names to track different repositories or branches.
In essence, “origin” is a convention, and while it’s not mandatory to use, adhering to such conventions can make collaborative work smoother and more intuitive.
When you clone a repository you automatically get
one remote called origin. If you start with a local repo
(git init) you can add one later:
Syncing Repository
Now we have created an empty repository on the GitLab Server we can
send the local changes to the remote using git push. The
command git push tells Git, “Thanks for tracking these file
changes. Now I want to upload these changes into the main project
file.”
When you push your changes, you are essentially updating the remote repository with commits that have been made in your local repository
To do this, use the command
In your case, you can type git push origin main where
“origin” refers to the “remote repository” and “main” refers to the
branch you want to upload.
If you go back to the repository on GitLab and refresh the page you will the repository has been synced with the local version.
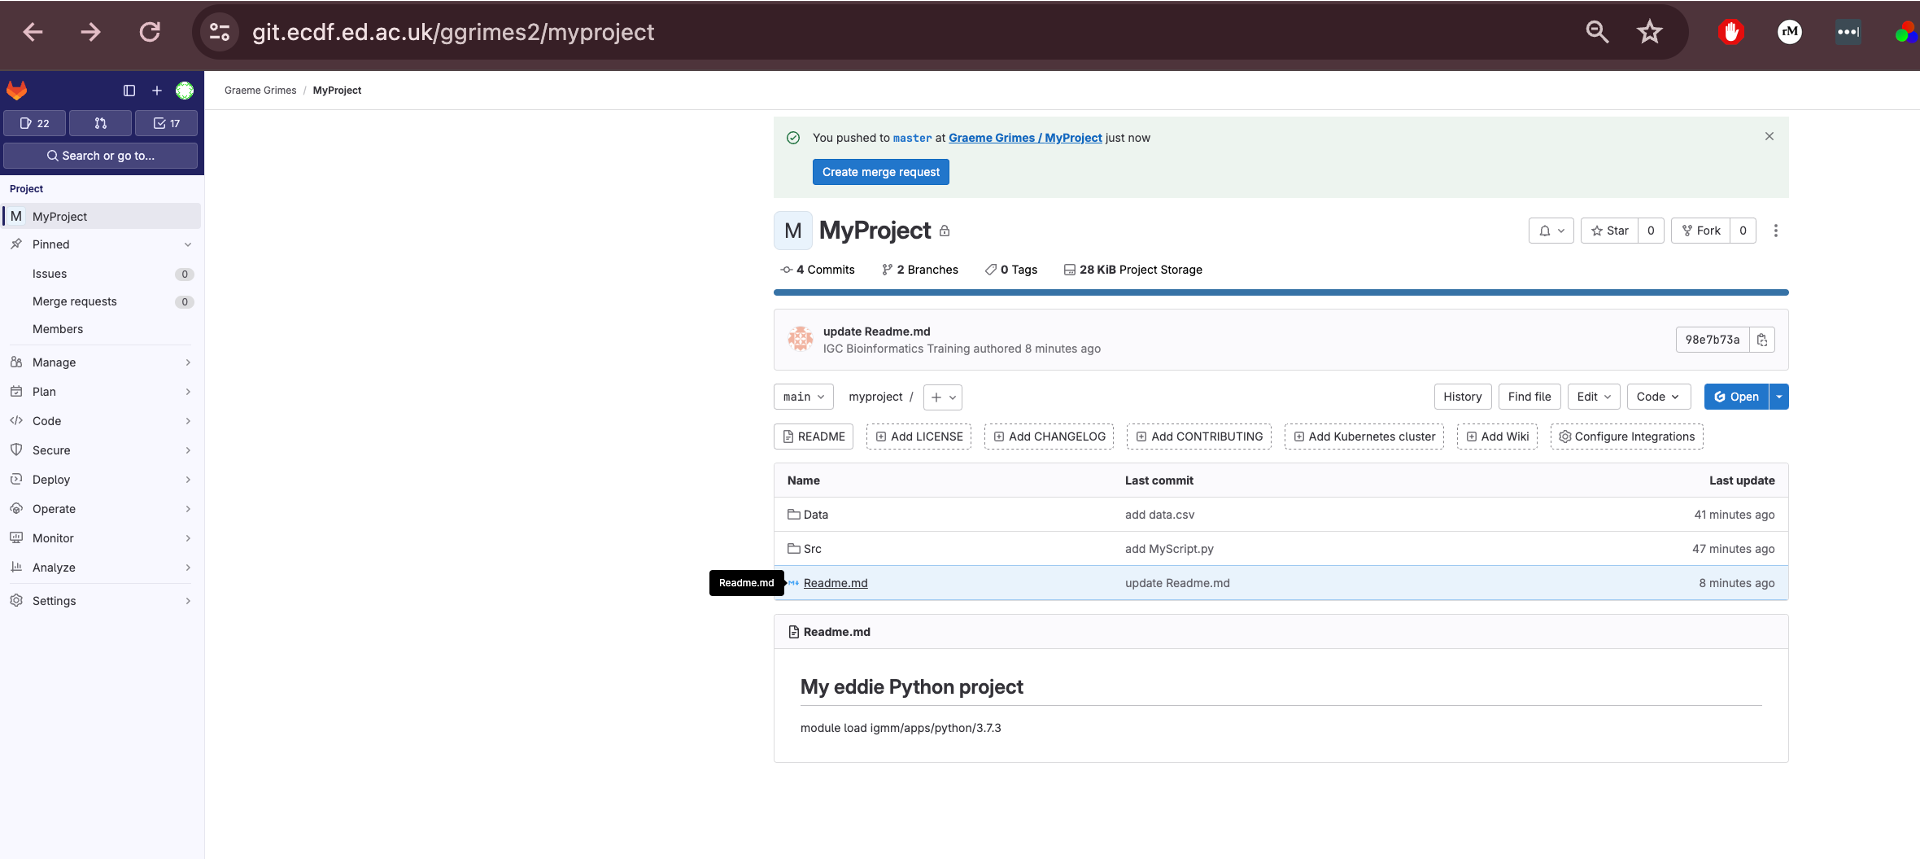
1. Syncing Changes
Make a change to the Readme.md file
Add this text, or something else, to the bottom of the
Readme.md file
## Data
The [data](https://figshare.com/articles/dataset/Data_Carpentry_Genomics_beta_2_0/7726454?file=14632895) is made available under an [Creative Commons license](https://creativecommons.org/licenses/by/3.0/).
Now we will, add, commit to our local repository and push changes to our remote repository.
BASH
$ git status
$ git add Readme.md
$ git commit –m "Add Eddie and Data subsections"
$ git status
$ git push -u origin main # run once
$ git push # use this afterLearners often forget the -u flag on their
first push. Emphasise that git push -u origin main
sets up the tracking relationship, allowing future
git push/git pull without extra arguments.
3. Pulling changes
Suppose a collaborator adds commits to our remote repository. Now we
need to get these changes locally. We can use the command
git pull to keep your local repository up to date with the
remote repository.
If there is no divergence, Git performs a fast‑forward merge. Otherwise you may need to resolve conflicts before completing the merge.
4. Handling a rejected push
You may see:
! [rejected] main -> main (non-fast-forward)This means your local branch is behind the remote. Fix it by pulling, resolving any conflicts, then pushing again:
BASH
$ git pull --rebase   # preferred: reapply your work on top of remote
# ...resolve conflicts if prompted...
$ git push
Challenge 1: Check your remote
- Run
git remote -v.
- The output lists fetch and push URLs for origin.
Challenge 2: Upstream tracking
After cloning, what command shows which remote branch your local main is tracking?
git branch -vv lists local branches with their upstream
counterparts.
Challenge 3: Predict the outcome
You run git fetch origin followed by
git log --oneline main..origin/main. What will appear and
why?
The log shows commits that exist in origin/main but not in your local main; the two‑dot syntax lists commits reachable from the second reference and not the first.
Challenge 4: Clone vs init
List one advantage and one disadvantage of git clone
compared to creating a repo with git init and then adding a
remote.
Advantage: git clone copies
all history and configures the remote automatically,
saving time.
Disadvantage: You cannot easily choose which files or
branches to include during the initial copy (though --depth
and --branch options help).
Summary diagram

- A remote is a named reference to a repository hosted elsewhere.
-
git clone URLcopies a remote repository and sets up origin. - Publish an existing repo with
git remote addfollowed bygit push -u origin <branch>. -
git pullequalsgit fetch+git merge; use--rebaseto avoid unnecessary merges. - A push may be rejected if your branch is behind; pull (or fetch & merge) then push again.
Content from Using Git with a Graphical User Interface RStudio
Last updated on 2025-11-11 | Edit this page
Estimated time: 17 minutes
Overview
Questions
- What is a Git GUI and how does it relate to the command line?
- How can I use Git in RStudio on the University of Edinburgh’s Noteable service?
Objectives
- Define what a Git GUI is and why you might use one.
- Use RStudio to clone a repository via its Git integration.
- Configure Git with your name and email address.
- Stage, commit, and push changes using RStudio’s GUI.
- Verify that your changes appear on the remote repository.
1. What is a Git GUI?
A Git GUI (Graphical User Interface) provides a visual alternative to
the command-line interface. Instead of typing commands like
git commit, users can interact with buttons, menus, and
panels. GUIs are helpful for:
- Beginners who aren’t yet comfortable with terminal commands
- Visualising the commit history and file changes
- Handling merge conflicts more easily
RStudio includes built-in Git support, making it easy to integrate version control into your analysis projects.
Reassure learners that the GUI is not a “less powerful” version of Git—it’s just another interface to the same tool. Some users will transition back and forth between the GUI and command line.
2. RStudio and the Noteable Environment
We will be using RStudio Server via the University of Edinburgh’s Noteable platform. This cloud-based RStudio environment supports Git integration and is ideal for version-controlled reproducible research.
3. Configure Git in Noteable
The first time you use Git in a new environment (like Noteable), you need to tell Git who you are:
You can run this in the Terminal pane in RStudio.
4. Clone a Repository with RStudio
Now let’s bring your project into RStudio: This can be found on the GitLab repository page.
- First copy the Clone with HTTPS text from GitLab
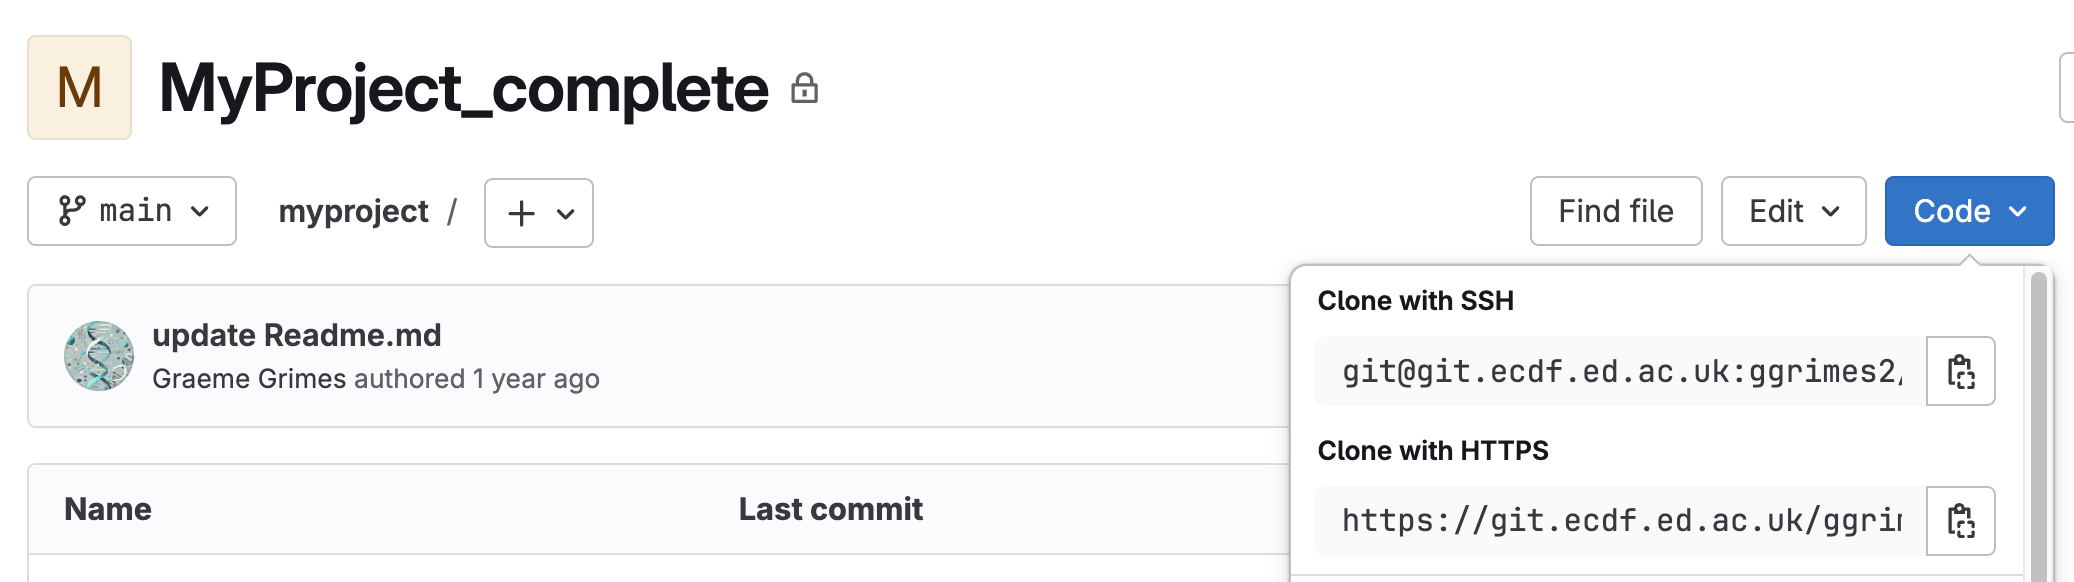
- In RStudio, go to the top menu: File → New Project → Version Control → Git
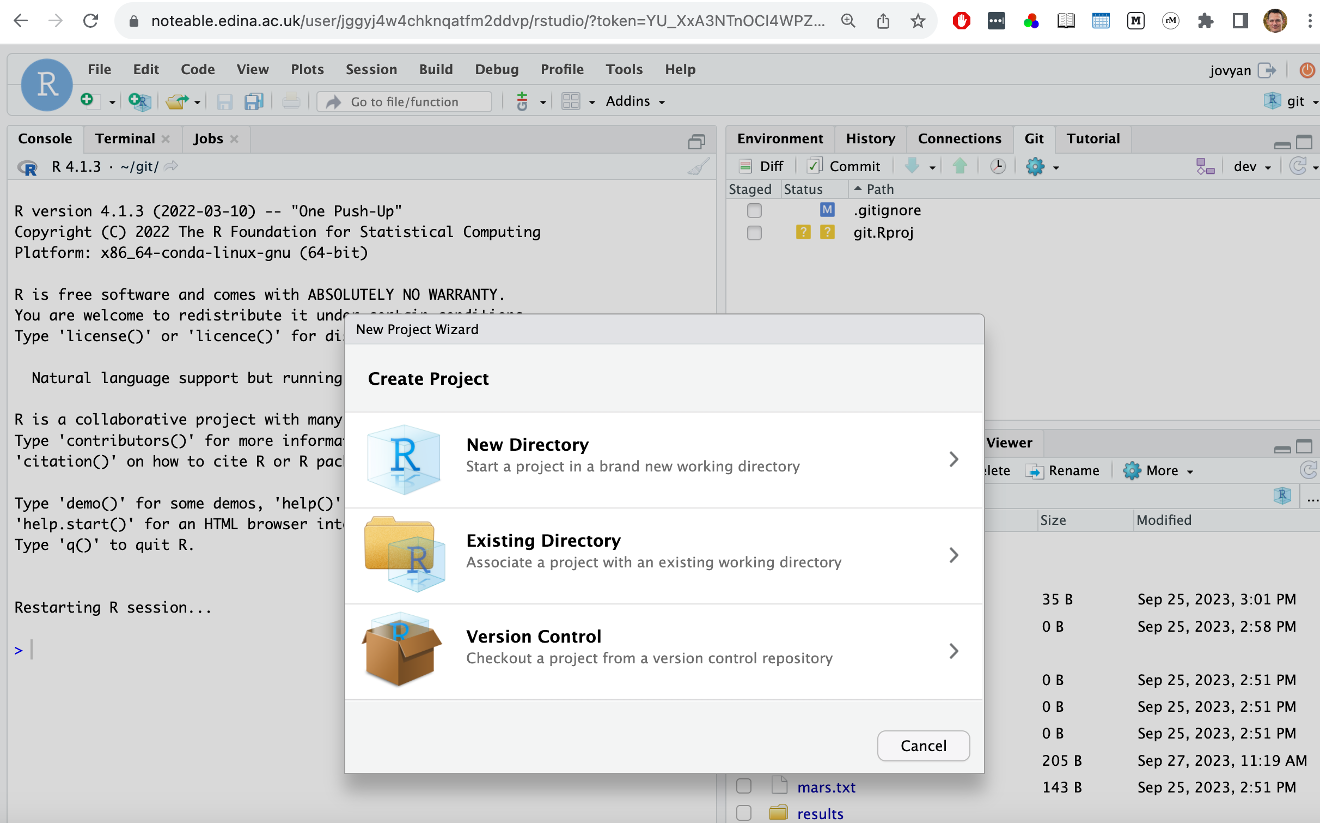
-
Enter the Repository URL:
https://git.ecdf.ed.ac.uk/<username>/myproject.git -
Choose a directory to clone into (e.g. your home folder or
~/projects)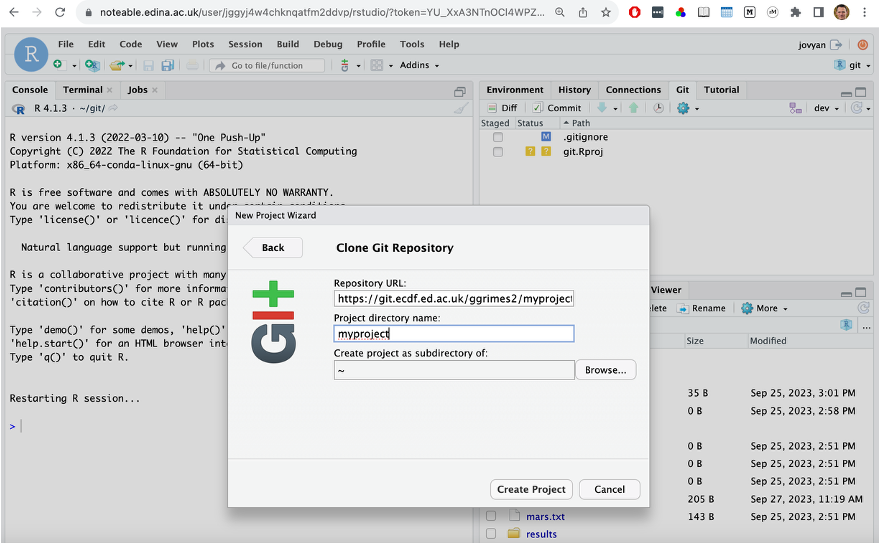
Click Create Project
RStudio will open the project and show the Git pane in the top-right.

5. Make a Change to README.md
- In the Files pane, click on
README.mdto open it. - Add a sentence like:
This change was made from RStudio on Noteable. - Save the file (
Ctrl + Sor File → Save)
6. Commit and Push from RStudio
- In the Git pane, you should see
README.mdlisted as modified. - Tick the checkbox next to it to stage the file.
- Click Commit. A window appears.
- Write a short commit message,
e.g.
Edit README from Noteable - Click Commit in the dialog box.
- Now click Push (also in the Git pane) to upload your changes.

7. Check the Remote Repository
- Visit your project page on https://git.ecdf.ed.ac.uk.
- Look at the Repository → Files tab to confirm that your changes have appeared.
- You can also check the Repository → Commits tab to see your message.
- Git GUIs offer a visual way to use Git—perfect for beginners and for visualising changes.
- RStudio’s Git integration supports cloning, staging, committing, and pushing.
- Always configure your name/email before making your first commit.
- You can verify success by checking your changes online.
Content from Collaborating
Last updated on 2025-11-11 | Edit this page
Estimated time: 18 minutes
Overview
Questions
- How do I collaborate with others using Git?
- What different models exist for Git collaboration?
- What are protected branches, and how do I handle merge conflicts?
Objectives
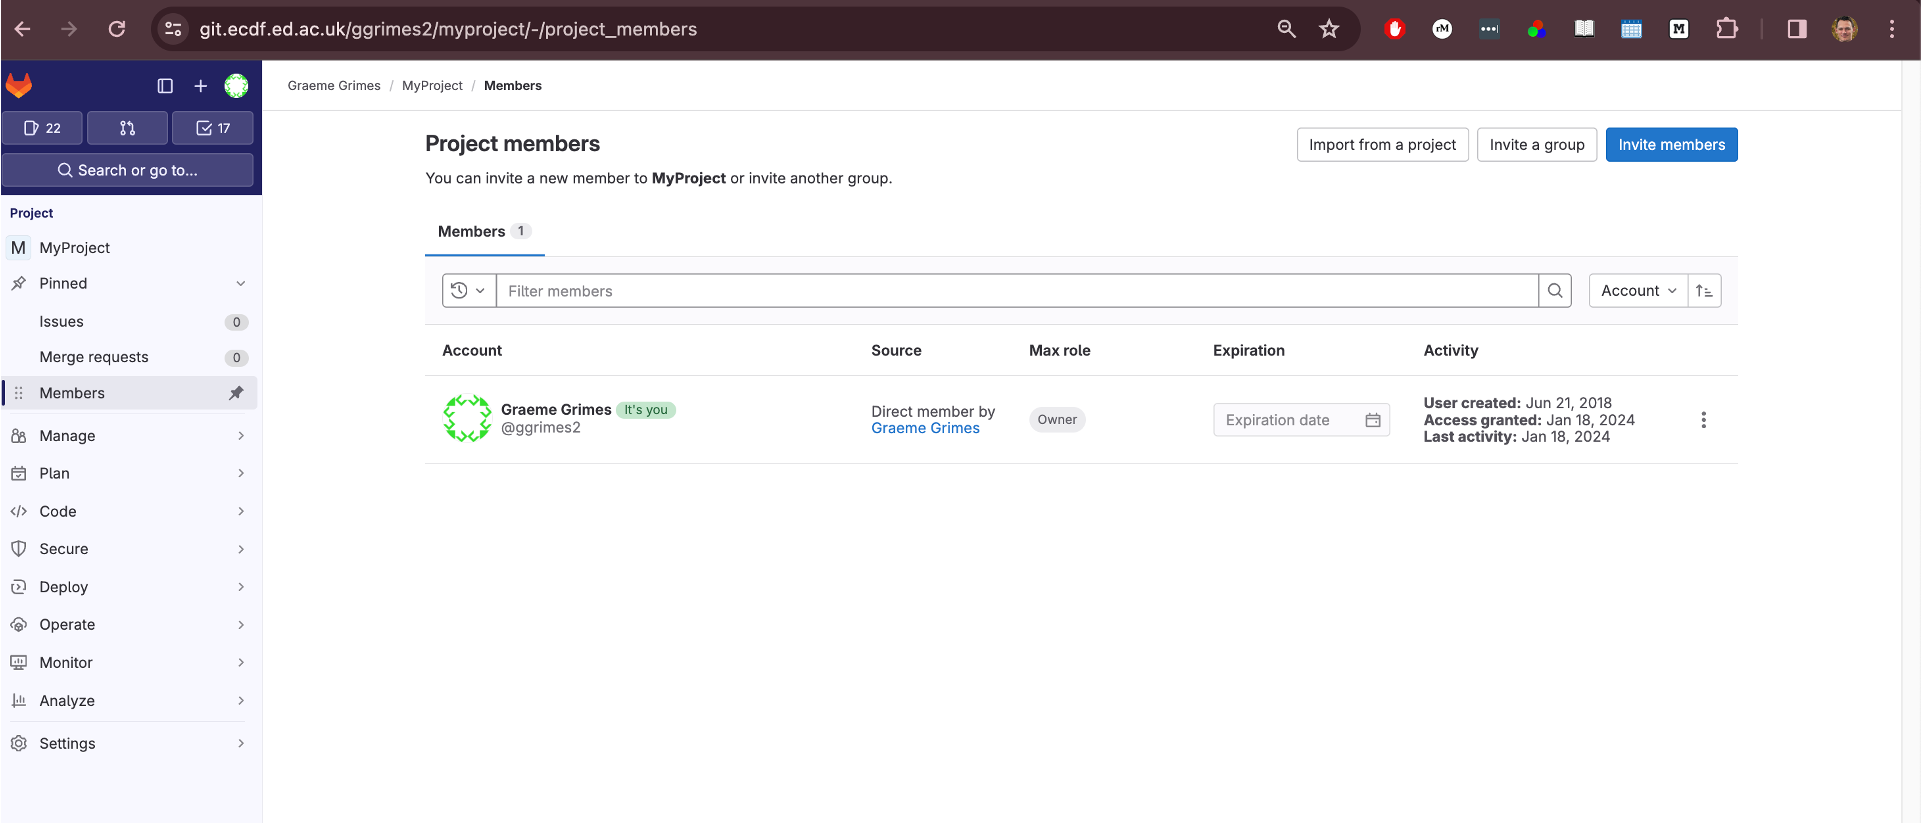
- Describe multiple models of collaboration using Git
- Demonstrate how to add collaborators and manage permissions in GitLab
- Practice cloning, committing, and pushing to a shared repository
- Understand how to resolve common issues like push rejections and merge conflicts
Collaborating with Git
One of Git’s most powerful features is that it makes collaboration
straightforward and trackable. When working with others, a shared
repository acts as the single source of truth. Contributors clone,
modify, and then sync their work using version control commands like
pull, commit, and push.
Different Models for Collaboration
There are several ways to collaborate using Git:
Shared repository model: You give collaborators direct access to your repository. This is quick but requires trust.
Fork-and-pull model: A collaborator creates a copy (fork) of your repository, makes changes, and submits a merge request (also called a pull request). This is commonly used in open-source projects. It may not work between two private repositories.
For this exercise, we assume a shared repository trust model. That means you’ll work directly in each other’s repositories.
We’ll now walk through the process of adding a collaborator and working on the same project together.
Step 1: Pair Up and Add a Collaborator
You will work in pairs. First:
- Introduce yourselves.
- Person 1: Get the UUN (University User Name) of Person 2.

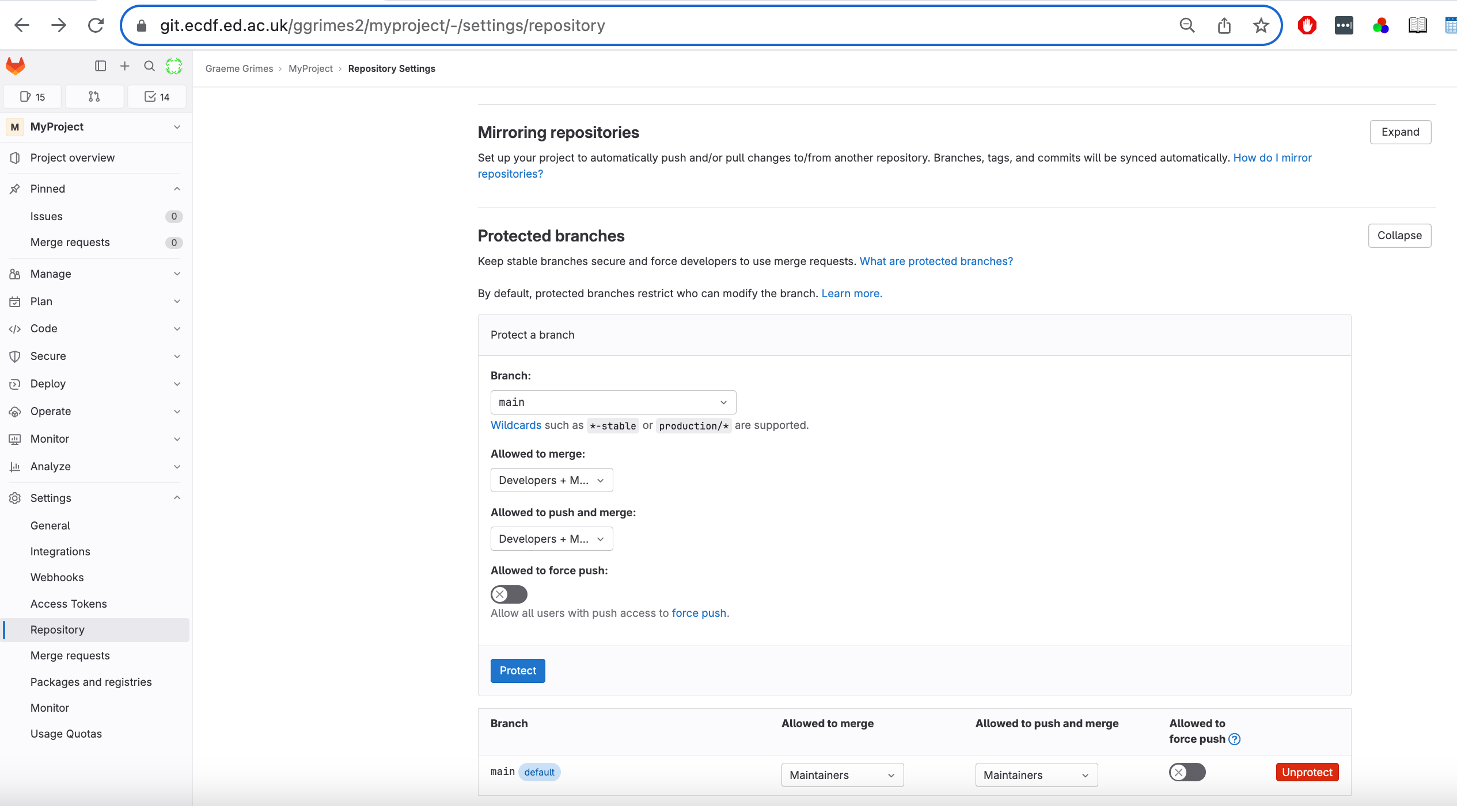
Step 2: Unprotect the Branch
In GitLab, branches can be protected to restrict who can push to them. To allow collaborators to push changes, you need to modify this setting:
- Go to
Settings -> Repository -> Protected Branches. - Find the
mainbranch (ormasterdepending on your setup). - Click Unprotect.
Step 3: Clone the Repository
What if you were given a link to a folder from a remote location that
you needed to get on your computer? How would you do that? You’d need to
make a copy of the remote repository to your local machine. In the world
of Git, this is referred to as “cloning.” The command for cloning is,
you guessed it, git clone.
Person 2 now clones the repository on their system (e.g., on Eddie):
BASH
git clone https://git.ecdf.ed.ac.uk/<person1>/myproject.git project-collab
cd project-collab
git remote -v
This creates a local copy of the repository and shows the remote repository settings.
Step 4: Check Who Edited What
Git provides the blame command to show who last modified
each line of a file:
This is useful when debugging or understanding the origin of changes.
Step 5: Make a Change and Commit
Person 2 can now make a change to the
README.md file:
After saving the file:
Step 6: Push the Changes
Now attempt to push:
Merge Conflicts
Sometimes two collaborators edit the same part of a file. This creates a merge conflict.
Git will mark the conflict like this:

You must manually edit the file to resolve the conflict, then:
This caches your credentials for one hour.
- Git allows multiple collaboration models; shared access is fastest but requires trust.
- GitLab permissions and protected branches must be configured for collaborators.
- Always pull before pushing to avoid rejection.
- Merge conflicts are normal and can be resolved with manual editing.
Content from Exploring History
Last updated on 2025-11-11 | Edit this page
Estimated time: 14 minutes
Overview
Questions
- How can I view the history of changes in a Git repository?
- How can I find out what was changed, when, and by whom?
- How do I explore history using the command line and RStudio?
Objectives
- Use
git logto inspect the commit history of a project. - Use
git showto examine specific changes within a commit. - Use
git diffto compare different versions of files or commits. - View history using RStudio’s Git interface.
- Use
git restoreto revert changes to a file.
Introduction
Git tracks everything. This means you can always go back and see who changed what, when, and why. This history is extremely useful for debugging, collaboration, and documentation.
Let’s look at some tools for exploring that history.
1. Viewing the Commit History (git log)
The most basic command to view history is:
This shows:
- The commit hash (a long ID)
- Author
- Date
- Commit message
This gives you a full history of commits, starting from the most recent.
Useful git log Options
-
Shorter Log View: Use
--onelinefor a more concise view. This is helpful when scanning many commits quickly. Terminal showing git log –oneline output
 -
Graphical History: To see a visual representation of branches and merges:
-
History of a Specific File: To see only the commits that affected a particular file, along with the changes made in each commit:
-
Filter by Author: To see commits made by a specific person:
2. Inspecting a Specific Commit (git show)
To see exactly what was changed in a particular commit, use
git show followed by the commit ID:
For example:
This command shows the commit message, author, date, and the full diff (changes) introduced in that commit.
If you want to see the content of a specific file at a given revision, you can do:
3. Comparing Changes (git diff)
git diff is a powerful command for comparing different
versions of your files. It shows you the differences between two points
in your repository.
-
Compare Working Directory vs. Staging Area: Shows changes you’ve made but haven’t yet added to the staging area.
-
Compare Staging Area vs. Last Commit (HEAD): Shows changes that are staged and ready to be committed.
-
Compare Working Directory vs. Last Commit (HEAD): Shows all changes since your last commit, whether staged or not.
-
Compare Between Two Commits: Shows the differences between any two specific commits.
-
Compare a File Between Two Commits: To see changes to a specific file between two commits:
4. Undoing Changes and Restoring Files
(git restore)
git restore is used to discard changes in your working
directory or to unstage changes. It can also be used to restore a file
to a previous state from a commit.
-
Discard unstaged changes in working directory:
Be cautious: this removes changes permanently unless they were staged or committed.
-
Unstage changes (move from staging area back to working directory):
-
Restore a file to a version from a specific commit:
5. Using RStudio to Explore History (GUI)
RStudio has a Git pane that allows you to explore commit history graphically:
Click on the History button in the Git pane.
-
Select a commit to see:
- Author and date
- Commit message
- File changes
You can diff individual files by selecting them.

This is a good way to review changes if you prefer a GUI over the command line.
6. Bonus: Who Wrote This Line? (git blame)
Git has a powerful blame tool:
This shows you, line by line, who last modified each part of the file, along with the commit ID and timestamp. Very useful for identifying the history of a specific part of the code.
Challenges
Challenge 1: What Changed?
Open a repository (your project or a partner’s). Then:
Run
git log --onelineand pick an older commit.Use
git showto see what was changed in that commit.-
Identify:
- Who made the change?
- What file(s) were edited?
- What was added or removed?
bash git log --onelinebash git show <commit-id>- Look for:
- Author and date near the top
- File names and the actual line changes below
Challenge 2: The Archaeologist
Your project’s README.md has changed many times. Your
task is to find the very first version of it.
- Use
git logto find the commit hash for the initial commit of the repository. - Use
git showto display the contents ofREADME.mdas it existed in that first commit.
Hint: You can combine the commit hash and the
filename in the git show command.
First, find the last commit in the log:
bash git log --onelineScroll to the bottom of the output to find the very first commit and copy its hash (e.g.,72041c0).Then, show the file from that commit:
bash git show 72041c0:README.md
Challenge 3: Who Did What?
You’re curious about the changes your collaborator made.
- Use
git logto find all the commits made by your collaborator in the project. - Pick one of their commits and use
git showto see exactly what they changed.
- Filter the log by author:
bash git log --author="Collaborator's Name" - Copy a commit hash from the output and inspect it:
bash git show <hash>
Challenge 4: Revert a Single Mistake (Safely)
Imagine you accidentally deleted a section from
README.md in your last commit. You want to get it back
without undoing all the other good changes in that commit.
- Use
git diffto compare your currentREADME.mdwith the version from the commit before (HEAD~1). This will show you the lines that were deleted. - Manually copy the deleted lines from the
diffoutput and paste them back into yourREADME.mdfile. - Stage and commit this fix.
This is a common and safe way to selectively recover code without using more complex Git commands.
- See what was changed in the last commit:
bash git diff HEAD~1 HEAD README.md - Open
README.mdin your editor, and re-insert the lines that are marked with-in the diff output. - Commit the fix:
bash git add README.md git commit -m "Fix: Restore deleted section in README"
-
git logis used to inspect the commit history, with options for concise, graphical, or filtered views. -
git showdisplays the details and changes of a specific commit or the content of a file at a past revision. -
git diffcompares changes between the working directory, staging area, and different commits. -
git restorecan discard unstaged changes, unstage changes, or restore files from previous commits. - RStudio provides a graphical interface for exploring Git history.
-
git blamehelps identify who last modified each line of a file.
Content from Ignoring Things
Last updated on 2025-11-11 | Edit this page
Estimated time: 12 minutes
Overview
Questions
- What is a
.gitignorefile? - Why should we use it?
- How do we create and manage it?
Objectives
- Explain the purpose of a
.gitignorefile in Git repositories - Create and edit a
.gitignorefile to exclude unnecessary files - Understand common patterns and pitfalls when using
.gitignore
What is .gitignore?
When using Git, you often have files that you don’t want to track. These could be:
- Temporary files created by your text editor or IDE
- Output files from running your code
- Large data files or binary files
- Configuration files specific to your machine
Git provides a file named .gitignore where you can list
patterns that match files or directories Git should ignore.
Why Use .gitignore?
If you don’t ignore unnecessary files:
- Your repository becomes cluttered
- You may accidentally share sensitive or large files
- Your collaborators may run into issues syncing or running code

How to Create and Use .gitignore
You can create the file manually:
And then edit it:
Or use RStudio’s Git pane: It often shows ignored files in grey.
Does It Remove Already-Tracked Files?
No. .gitignore only affects new files.
If you’ve already added a file to Git, .gitignore won’t
stop it from being tracked. To remove a file already tracked:
Then add it to .gitignore.
Challenge: Ignore and Track
Challenge
- Create a file called
secret.txtand add some text to it. - Add it to your
.gitignore. - Try running
git status— is it listed? - Add and commit your
.gitignorefile.
Advanced Tip: Ignore Locally Only
If you want to ignore files only on your machine (not share with others), you can use:
This works like .gitignore, but it’s not
committed to the repository.
- Use
.gitignoreto prevent tracking of unnecessary or sensitive files - Edit
.gitignoreearly in your project to keep your history clean - Use
.git/info/excludefor machine-specific ignores - Files already tracked by Git won’t be ignored retroactively